


How to Paint a Flower Garden: Step-By-Step Acrylic Art Lesson
This colorful acrylic painting of a house covered in flowers is really vibrant and fun to paint! Although it looks complex, once I break it down for you in this step-by-step acrylic painting tutorial, you will see that it’s much simpler than it looks.
This tutorial will particularly help you level up your understanding of layers and detailing, and how those two elements can make an acrylic painting come to life! So let’s start, as usual, with the materials list:
9 Easy Steps to Paint a Flower Garden
Step One

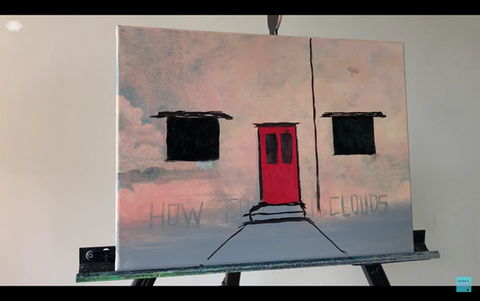
We’ll start with some good ol’ acrylic color mixing. You want to end up with a pale, salmon pink, a dark gray, and a light gray to kick things off. Also, please note that when I first made this tutorial, I was painting over an old tutorial (you may recognize the clouds from a few weeks ago). I would encourage you to do the same if you ever have a work that you’re unsatisfied with: nothing has to be permanent! 😊
Step Two

Grab your ½” flat brush and some dark gray and draw on the outline of the doors and windows. This is just a sketch to guide us later as we add layers. The door and windows can go wherever you want; I’ll be saying that about a lot of things in this tutorial because remember: art is about freedom!
Grab some light pink on your M1 (large) blending brush and fill in the whole canvas. Don’t worry if a little covers your door and window outlines so long as you can still see them. Now wait until the paint dries or use a blowdryer to speed it up.
Now apply light gray at the base of the canvas for the walkway in front of the house. Paint a little leading up to the bottom of the door. Mix some yellow and white and layer over the pink, using light circular motions with the wrist. This is how you blend acrylic paints. The base layer of pink will show through, giving the wall of your house some cool layered color! 🎨
Step Three
Now we are going to continue putting down our foundational layers that will guide the other layers we apply later! Mix the colors that you’ll use for your door. The door can be any color you’d like 🌈; it doesn’t have to be red like mine (I mixed red with a little yellow)!
Mix some black and yellow to get a black color that’s a little lighter than the one right out of the tube. Grab a damp flat ½” brush or other stiff flat brush with that black and use it to outline the door again and fill in the windows. You can freehand the straight lines like I did, or use masking tape if you prefer to be more precise.
Add some windows in the door, as well as a vertical line for where the walls of the house meet. Finally, draw the outlines of the front doorstep and the path leading up to it, and some small awnings over the windows. We now have the foundations for our beautiful acrylic garden house painting!
Step Four

Now we’re going to add a layer of detail to our garden house! This acrylic tutorial is all about layering, and how you can build up to a very complex-looking painting with a series of simple layers.
Grab some white and leftover pink on your flat brush and use it to add some vertical panes in your windows. Grab some white on your flat brush and add an outline of trim to the windows as well as thin horizontal trim where the windows open and close.
Also add some skinny window panes to the two windows on your door. Grab some black and add details on the door like a mail slot, doorknob, and carved details in the wood.
Step Five

Now we’re going to use an acrylic painting technique that I haven’t done yet in this series! Grab your artist’s sponge and use it to pick up some of the leftover black we mixed earlier. 🧽 Start dabbing it on the walls of your house to make some plants growing up the side of the house.
Apply your dabs closer together toward the bottom of the canvas where the plants will be thicker, and space out your dabs more as you work your way up the wall. Again: feel free to make creative choices here and put the plants on the wall in any shape you’d like!
Now mix a shade of very dark green. I did it by mixing some black, blue, and yellow. Do the same sponge dabs in this dark green color, following the same shapes you just laid down in black with the sponge. Now mix in a little more yellow to get a medium green and do the same thing. Leave the bottom bushes darker but add the medium green in patches everywhere else.
Add some white and yellow to the medium green to get a light green and do yet another layer of sponge dabs. Finally, pick up some plain yellow on your sponge and add very sparing little patches of yellow where you want to show sun rays hitting the plants. See how with each layer, the plants look more real? Pretty cool how simple things add up to a complex look! 😎
Step Six

Now we’re going to do one of my favorite parts of any painting: blending paint on canvas! 🖌 Grab some black or very dark green on a blending brush (ideally your M2 medium-sized brush) with some water on the brush so that you’re working transparent. We’ll be using that to add shadows.
Add most of your shadows to the bushes at the bottom, but some to the undersides of the plants on the wall as well. Also add some shadows here and there on the pavement in the foreground. Dry your brush off and use light swirling motions with the wrist to blend in all those shadows you just added.
Now for some more shadow work! Grab your #4 brush, get it wet, and add some black to work transparent again. Add shadows to one side of your door, painting right over the color below. In my example, I added shadows to the left side of the door. Also add transparent black to the right side of the vertical line you painted earlier on the wall, as well as a little under the window awnings. Paint in some extra black lines in the pavement, then add white lines next to them.
Finally, clean your brush and load it with water and yellow to work transparent again, this time for highlights. Paint over the other side of your door (the right side in the example above) where the sun will be hitting it. Step back and take a look at how much dimension those shadows and highlights are starting to add to your acrylic painting!
Step Seven

We’ve just got one more step to prepare the way for the flowers to bloom! Grab some leftover light gray paint on your #4 medium brush and quickly add some rocks toward the bottom of the bushes. Add some little yellow highlights on the right side of those rocks. Now grab some black on your detail brush and add some lines and cracks to the rocks. Use the same brush to paint in the outlines of tiles on the doorstep. You can also use the same brush and color to go back and sharpen up the black details on your door, like the carvings and doorknob.
Clean off your detail brush and add some water and white (working transparent), then add highlights to the doorstep tiles. Go back to your #4 brush with black (working transparent) and add another layer of shadows to your pavement. These will be the natural aging and stains you see on a sidewalk, and can look really cool. Blend that layer you just added with a dry brush until you’re happy with how it looks. 😊
Step Eight

Now I’m going to show you how to paint flowers! 🌸🌼 This is my favorite part, and is really easy and fun! As you can see above, though, I mixed a pale purple and pink, then used red, white, and yellow straight from the tube. You can mix any colors you’d like for your flowers, though; don’t be constrained by the colors I used if you’d prefer something else!
The process will be the same for each color: grab your detail brush and, following the pattern of the plants you laid down earlier, speckle in some little dots where you want your flowers to be. Don’t spread every color across all the plants; give them each their own space to thrive, but let them overlap a little. You can see what I’m talking about above. This will give it more visual interest than having every color everywhere.
Step Nine

As usual, our final step is just about polishing up your acrylic garden painting with detail work and really letting it shine! 🏡🌸 Grab your M2 brush with some dark green or black and blend some shadows into the top left of the painting.
Now grab your detail brush with some water and black and start tracing the edges of some of the flowers. The contrast will make the colorful flowers pop more. You don’t have to get them all, and as usual, you can spend as much time on the detail step as you’d like! Some people like their paintings to look really sharp and photorealistic, while others like them to have soft edges.
Mix yellow with some black to get a dark yellow and then use your detail brush to add some stems and leaves to the flowers at the bottom of the painting. You can reference the shapes I used above.
For our final step, grab some white on the ends of a dry medium flat brush and gently add dabs of white on just some areas of your plants; this should come out as little white dots that resemble tiny white flowers. Do the same with black to represent flowers in shadow in some areas. Go as detailed as you’d like!
All done!
I hope you enjoyed this easy step-by-step painting tutorial! This tutorial was all about showing you the power of layers in your acrylic paintings. Hopefully you’ve seen how you can end up with a very complex and elaborate-looking painting just by adding a series of simple layers.
I would strongly encourage you to go and practice this layering technique on an original work of yours! Don’t worry how it will turn out; just get lost in the moment and go for it! 😊
Please leave a comment if you tried this tutorial or just learned something new from reading it. Also, be sure to send me your results @colorbyfeliks.community on Instagram if you recreate this tutorial, so I can share your work! I’ll see you next week!
And remember, you can buy all the products I used in this tutorial below:
Many blessings,
Feliks K.