


How to Paint the Ocean: Step-By-Step Art Lesson
I’m back to revisiting one of my classic acrylic painting tutorials this week! This one will be a perfect addition to your toolkit of painting skills: we’re painting the ocean.
If you paint landscapes at all, you’re bound to paint an ocean at some point, so this quick tutorial will give you some easy acrylic painting techniques that you can bring to all your seascape paintings. Let’s begin!
You’ll need the following materials; follow the links to purchase these art supplies if needed.
Materials:
- Palette
- Palette knife (for mixing paints)
- Jar of water (to keep brushes wet)
- 4-Piece brush value pack
- Set of 5 basic color acrylic paints OR 24-color acrylic paint set
- Canvas (size of your choice)
8 Easy Steps to a Sea Painting
Step One

Mix your acrylic colors to get roughly the same colors you see here. Remember: they don’t have to be exact, and it’s always best to start small with the amount of paint you’re mixing, until you have a color you like. You want a cream color, a light aqua, and a darker aqua.
Step Two

Layout the sky using these three colors and your M1 blending brush.
As usual, go from light to dark, bottom to top, and don’t blend yet! Re-wet your brush if it drags while you’re laying out your colors. Clean off your M1 brush in your water jar and dry it with a paper towel or rag, then we’re going to do our usual signature technique for blending paint on canvas: fast swirls using the motion of the wrist and BARELY touching the canvas. [Side note: ignore the trees and darker blues under my sky: I was painting over some older work! 😅]
Step Three
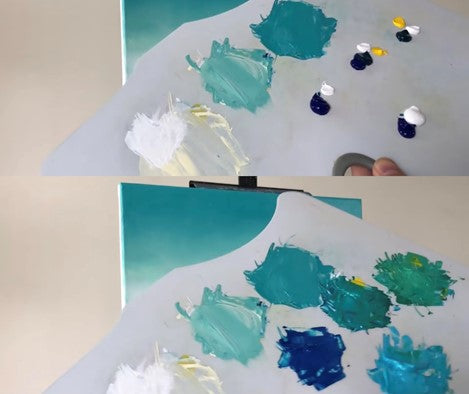
Now it’s back to the palette, where we’ll blend four more shades for our acrylic seascape painting. I used some viridian green as part of my color mixing, which is from my 24-set of acrylic paints, but you can easily replicate the color with a regular set of primary colors.
Again, start small and don’t worry about getting your colors to exactly match mine. Just get them roughly in the same range.
Step Four

Grab your ½” flat brush and paint in your horizon line with the darkest blue you just mixed. Add a line of the second-darkest shade right beneath it. Then go beneath that with the slightly lighter green shade you just mixed.
Now go back to the palette again and mix a little bit of black and white with the leftover paint of your second-darkest blue shade to make a turquoise-tinted grey.
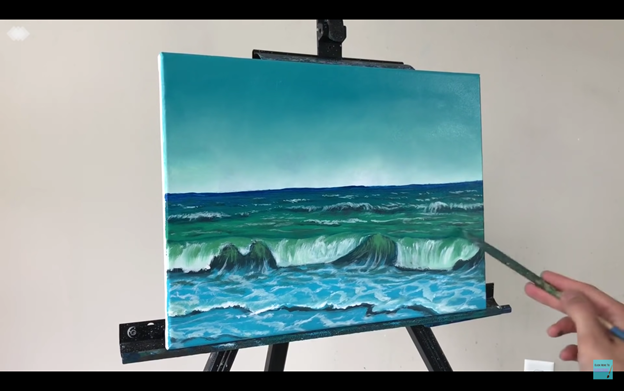
Use that grey to paint in the lines of some small rippling waves, slightly angled (see the photo above; you don’t want them perfectly straight-across). In the foreground, paint the shadowy underside of what will become some crashing waves. You’re already well on your way to learning to paint the ocean on canvas!
Step Five

With the same 1/2 “ flat brush, grab some of the lightest blue you mixed and apply it at the bottom of the canvas around those crashing wave shadows you just painted. Let some of it come up into the underside of those crashing waves.
Remember: the final painting may look complicated, but this is actually the perfect tutorial for beginners!
That’s because you’re learning how a seemingly complex landscape is just a series of simple layers, and right now we’re putting down the foundational layer.
Now use the grey to add some more ripples in the midst of that light blue (see how the layers come together?). For extra credit, you can grab some of that grey on your detail brush as well and add some more grey ripples in the distance.
Finally, mix a lighter green on your palette from some yellow, blue, and white and use it to fill in around the shadows of the crashing waves. You can see me applying that green in the photo above.
Step Six

Part six of your beautiful water painting is all about adding seafoam. Grab some titanium white on your ½” flat brush and paint the top side of the crashing waves (that green area around the shadows) with some streaks of white foam.
Then, use that same white to follow behind the lines of your grey ripples in the foreground and the background. In both cases, blend a little as you paint.
Now, we’ll add some seafoam to the top of the water in the foreground. Go very light and add natural-looking shapes almost like circles or diamonds to replicate the way foam gathers together on the water’s surface.
Remember to make these shapes smaller as you go further back. Finally, add some white lines coming up on the shadowy underside of the waves and following a curved shape like you can see above.
Step Seven
You’re almost done with your stunning nature painting! With your ½” flat brush, add some green to the top part of the underside of your crashing waves.
Grab some grey and add deeper shadows at the base of those crashing waves, as well as some deep shadows under the waves further back. These deeper shadows will give the painting more depth. Now make sure your brush is dry and go back, working dry, to blend in those greys.
Step Eight

It’s detail time! Grab some titanium white on your detail brush and use it to bring down some more foam from the top of your waves downward in little streaks. When you’re satisfied with the foam you’ve added to the wave-tops, use a very light touch to add some white to the ripples on the water’s surface.
Then add some white streaks on the underside of those waves in the foreground to really make them pop. Follow a similar diamond/circular pattern as the foam you painted earlier on the top of the water in the foreground.
As always with the detail step, remember that you can spend as much time as you’d like on it. Some people like the painting to have a softer feel, while others like to spend lots of time on the details and make it sharper and more realistic: it’s up to you!
All done!
I hope you enjoyed this easy step-by-step painting tutorial! The point of this acrylic tutorial was not just to teach you how to paint a beautiful seascape painting, but also to show you how a complex-looking painting is actually fairly easy to paint, even for beginners, if you just break it down into layers.
Please leave a comment if you tried this tutorial or just learned something new from reading it and I’ll see you next week!
And remember, you can buy all the products I used in this tutorial below:
- Palette
- 4-Piece brush value pack
- Set of 5 basic color acrylic paints
- Set of 24 acrylic paints
- Canvas
Many blessings,
Feliks K.