


How to Paint a Starry Night Sky with Acrylic Paints

Hi Friends! Starting today, I’ll be working my way through some of my classic acrylic painting tutorials, and giving you step-by-step instructions on how to recreate them yourself! If you’d like to view the full video on YouTube, you can watch it here. This one may look complex, but it’s actually pretty simple when you get down to it, and is great for acrylic painting beginners as well as those of you who are more experienced since it only uses primary colors.
I live in the Pacific Northwest of the United States, and landscapes of evergreen trees like this are common here. The sky doesn’t always light up with that aurora-like intensity at night, but as with most of my landscapes, I like to exaggerate a little 😉. Part of the fun of creative painting is that you can use your imagination to have more fun with color. Sunsets, clouds, stars, and other skyscapes are a particularly great place to start experimenting with acrylic painting inspiration! Now let’s get started! You’ll need the following; follow the links to purchase these supplies if needed.
9 Steps to Painting a Starry Night
Step One

We’ll start by mixing the colors that you’ll use for the background of your painting. We’ll leave a dab of ultramarine blue on its own, and also mix a deep green and a lighter green. You don’t have to mix in exactly the same quantities as me; the point is just to get three different shades for our background.
Step Two

When you have your three shades mixed, use the M1 brush to apply the colors in roughly even-sized segments; don’t worry about blending yet. Start with the ultramarine blue at the top of the canvas and work your way down, dark-to-light, until the whole canvas is covered. Once the canvas is covered, clean off your M1 brush and make sure it’s just a little damp, but not too wet. Use very light contact and a swirling motion to blend the colors together into a smooth gradient.
Step Three

This step is a lot of fun! Add a small dab of titanium white to your small cup, and mix it with just a couple tablespoons of water. Dip your #½ flat brush into the white paint. Angle the brush down towards the canvas and use your finger to flick white paint onto the canvas; this will be the stars⭐️. You can direct the brush where you want the paint to go, and make the stars as concentrated as you want; there is no right answer! Then use your #0 detail brush and some more titanium white to add bigger stars here and there. Use your #½ brush again, this time to paint a shooting star wherever you’d like 💫.
Step Four

For this step, we’ll go back to the palette to mix a few more colors. Using black, white, red, and yellow, mix two different shades of brown: one darker and one lighter. Then mix a regular green using yellow and blue. Again, these mixes don’t have to be exactly the same as mine; you just want three different colors to work with.
Step Five

Using the darker brown, go in with your #½ flat brush and paint the tree trunks and branches at different distances. Then use light dabs with your #8 medium brush to fill in the leaves on the trees with the lighter brown that you mixed. Follow the shape of the branches. You can also use your #4 brush for smaller sections.
Step Six

Use the #8 or #4 brush to apply some of the green for lit-up needles on the branches, using the same dabbing motion. Make sure to only apply it to one side of the tree branches to match the way light would hit the trees in real life. Mix mostly yellow and some red to make a light orange and add even brighter highlights to some of the branches, but apply more sparingly than the green. Again, add highlights only to one side of each tree (the same side as the green).
Step Seven

Take your #0 detail brush and use the lighter brown we mixed to add more detailed pine needles and small branches to the fringes of the tree branches. Get as detailed as you want; more detail will add more of a realistic feeling to the painting. Finally, mix a little yellow and white on your palette to add some dramatic highlights to the side of the tree trunks.
Step Eight
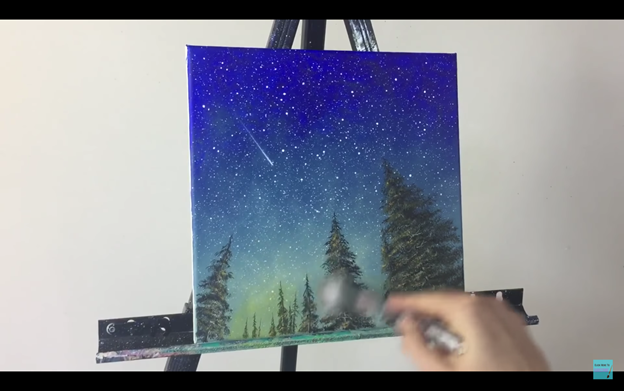
This last easy step will really add some extra pop to the painting. Use some unmixed cadmium yellow and apply it in a very light, swirling motion to the lower part of the painting among the trees. This will blend beautifully with the greens in the background to create a sort of aurora effect and really make the trees stand out dramatically.
All done!
How does it feel knowing you painted a gorgeous starry sky and a northern forest all with five simple acrylic colors? Bet you didn’t think it would be that easy to create a stunning nature painting! Be sure to check back on the blog weekly for more acrylic painting ideas for all skill levels. Whether you are a beginner or an expert, I encourage you to dive headfirst into all of my acrylic art tutorials. You’ll learn how to blend colors with acrylic paint, as well as many other painting techniques. Or, you can just refine and practice your painting skills!
Be sure to subscribe to my newsletter so you don’t miss any new lessons on my blog or YouTube channel, as well as newsletter-only discounts on my products.
And remember, you can buy all the products I used in this tutorial below:
Let me know if you enjoyed this written tutorial in the comments below, and stay tuned for more coming soon. Until then, keep creating!
Many blessings,
Feliks K.